CRYSTAL REPORT 2013 GETTING STARTED
CRYSTAL REPORT 2013 GETTING STARTED
Download sample database extreme.mdb from
or
|
STEPS
1) Run Crystal Report 2013.

2) In the "Start a New Report" area, click Blank Report.

3) Create New Connection
3-1) The Database Expert dialog box appears.
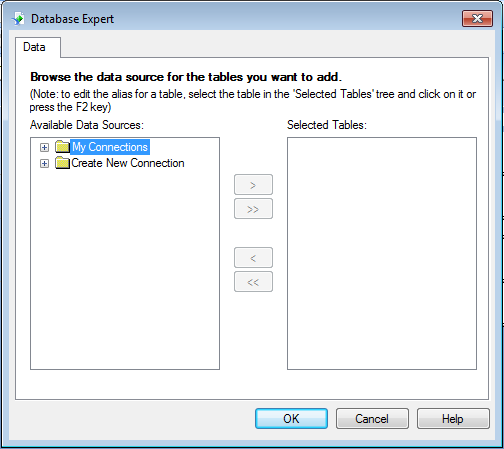
3-2) In the Database Expert dialog box, expand the Create New Connection folder and then expand the Database Files folder; then search for the Xtreme.mdb sample database.

3-3) Database is loaded into the Crystal Report 2013 application.

3-4) Expand the Tables node of the Xtreme.mdb connection to see a list of tables.

3-5) Select Customer and click the > arrow to add it to the Selected Tables list, and then click OK.

3-6) The Design tab of the Report Designer appears.

4) Field Explorer
4-1) Click Field Explorer on the Standard toolbar.

4-2) The Field Explorer dialog box appears.

5) Report Sections
5-1) The Design tab is divided into five sections: Report Header (RH), Page Header (PH), Details (D), Report Footer (RF), and Page Footer (PF).

5-2) Go to Menu Bar. Select File/Options…

5-3) Select Short Section Names.

5-4) Outcome.

6) Inserting Fields
6-1) Expand the Database Fields node in the Field Explorer dialog box and expand a table.

6-2) Right-Click Customer_Name and select Browse Data.

6-3) Outcome.

6-4) Click the Customer Name field and drag it into the Details section of the report.
An object frame appears with the Arrow cursor as you drag the field onto the report.
• The object frame represents the object you have just selected for placement.
• The size of the object frame approximates the size of the data in the field selected.

7) Print Preview
7-1) Go to Menu Bar. Select View/Print Preview.

7-2) Outcome.
Close Preview Tab.

8) Print Format.
8-1) Go to Menu Bar. Select File/Options…

8-2) Deselect Show Field Names.

8-3) Outcome.
The object frame contains Xs to indicate that the database field contains a text string

8-4) Notice that initially the Format Tool Bar is dimmed (not active).

8-5) When you click the field object in Details Section, the Format Tool Bar becomes active.

9) Adding Additional Fields
9-1) Highlight the City field in the Field Explorer dialog box, press the Ctrl key on your keyboard, and then highlight the Country field. Release the Ctrl key.

9-2) Drag the fields to place them.
As the cursor is moved over the report, an object frame appears along with the Arrow cursor.
Place the fields to the right of the Customer Name field.

9-3) Outcome.

9-4) Print Preview.

10) Save and Close.
10-1) Save as Customer List.

10-2) Close your report.

No comments:
Post a Comment